

Développez votre site visuel à l'échelle mondiale sans code backend.
Webflow est la plateforme de premier plan pour le développement visuel, mais la localisation native peut s'avérer complexe et coûteuse. MultiLipi s'intègre directement dans l'architecture de Webflow via une simple injection de script, transformant instantanément vos pages statiques et vos collections CMS en une infrastructure multilingue avec une indexation SEO complète.
Ce guide détaille le processus d'intégration en utilisant le Code personnalisé fonctionnalité.
1. Prérequis de déploiement
Avant de commencer, assurez-vous que votre environnement répond aux exigences :
Forfait de site Webflow
Vous devez être sur un Forfait de site de base (ou supérieur) pour débloquer la fonctionnalité "Code personnalisé".
Clé API MultiLipi
Localisez ceci dans votre tableau de bord sous Paramètres > Général.
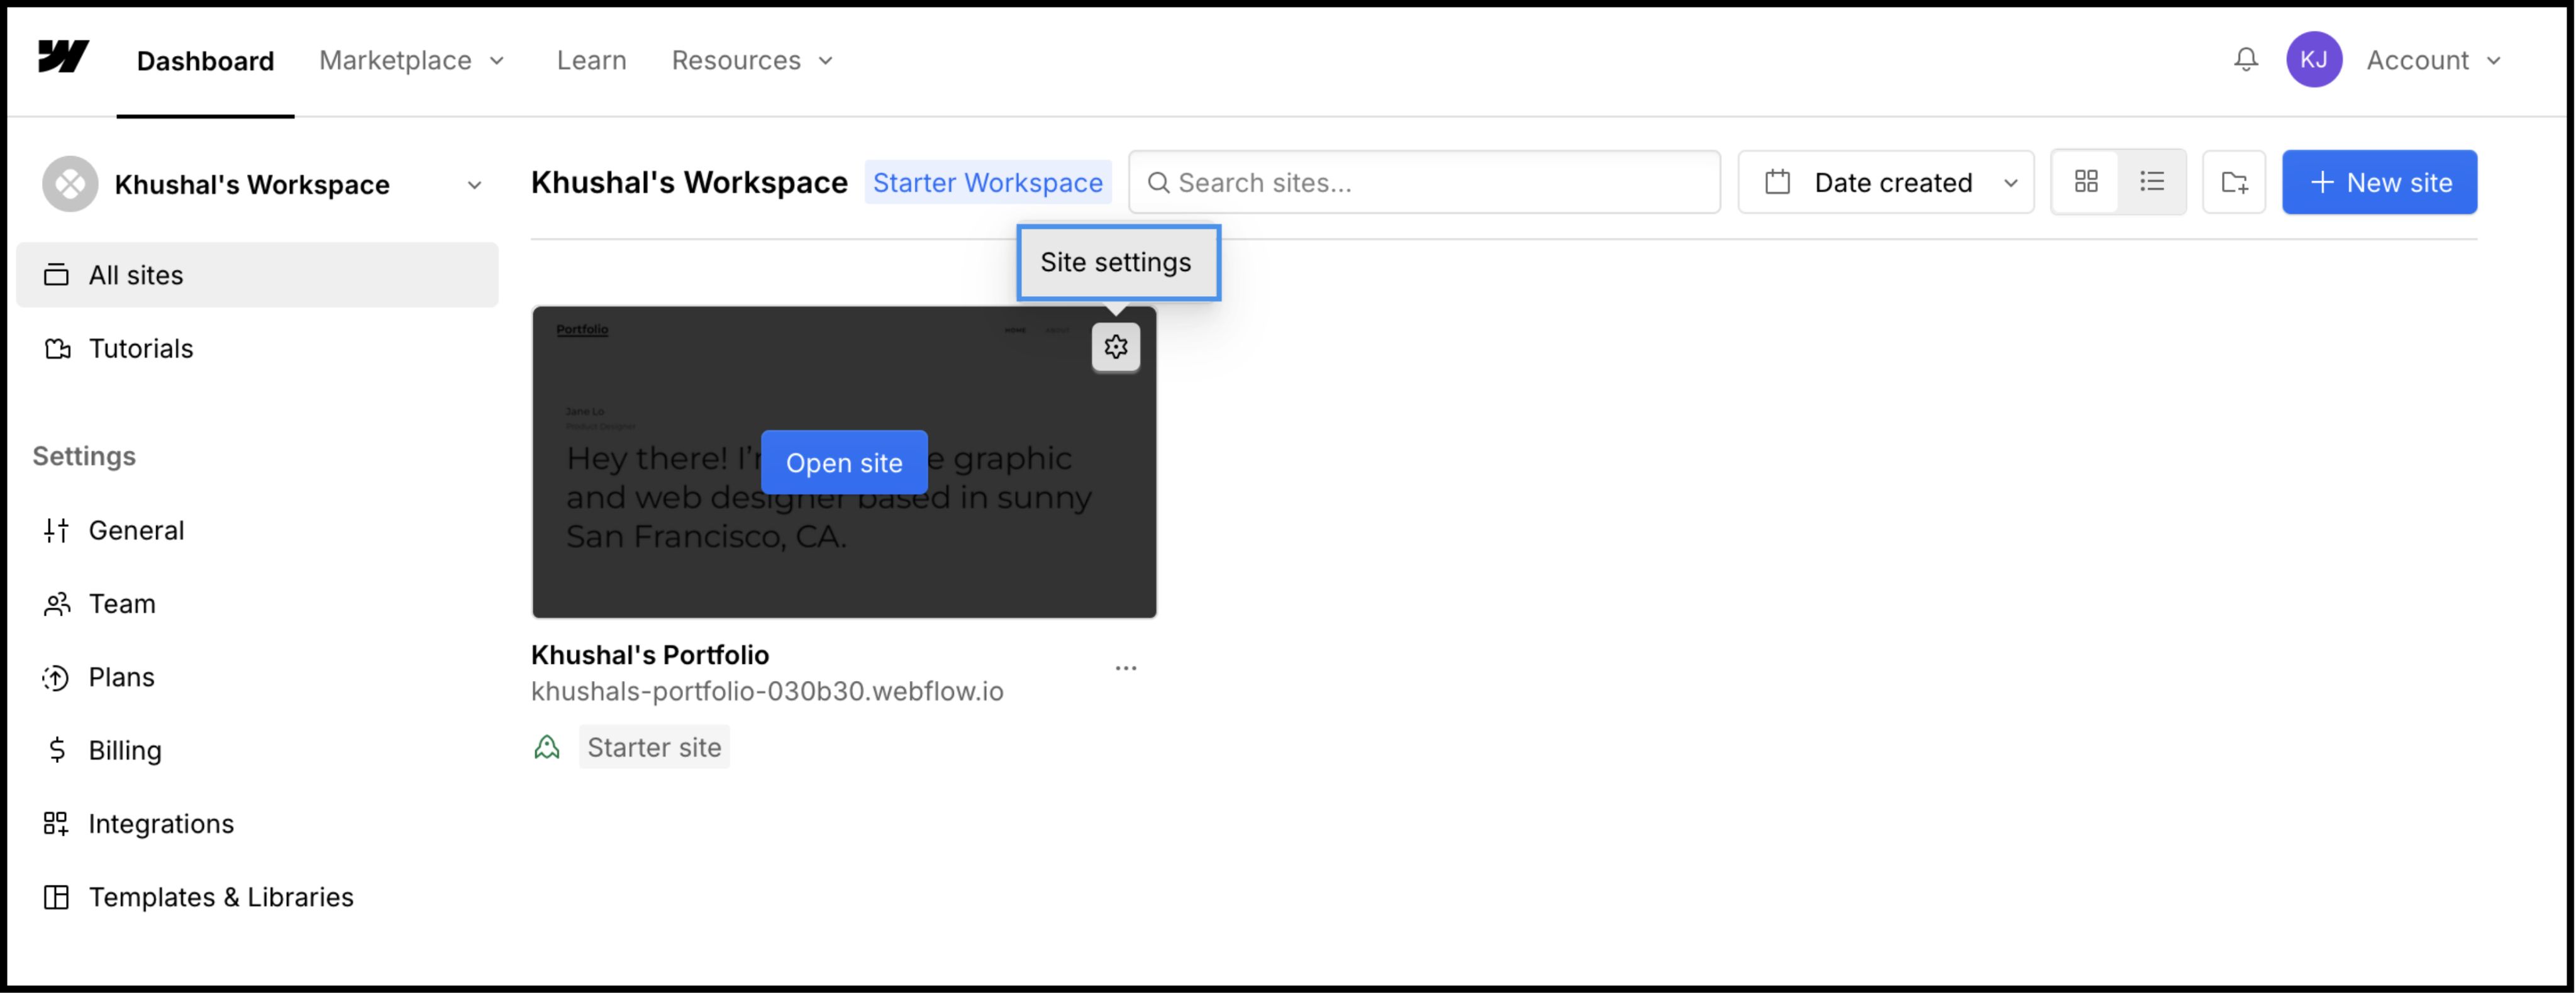
2. Étape 1 : Accéder à l'architecture du site
Nous injecterons le moteur de traduction dans l'en-tête global pour garantir sa persistance sur toutes les pages et tous les modèles CMS.
- 1
Connectez-vous à votre Tableau de bord Webflow.
- 2
Localisez la carte de votre projet et cliquez sur l'icône Paramètres (⚙️) (ou sélectionnez Paramètres du site dans le menu Designer).
- 3
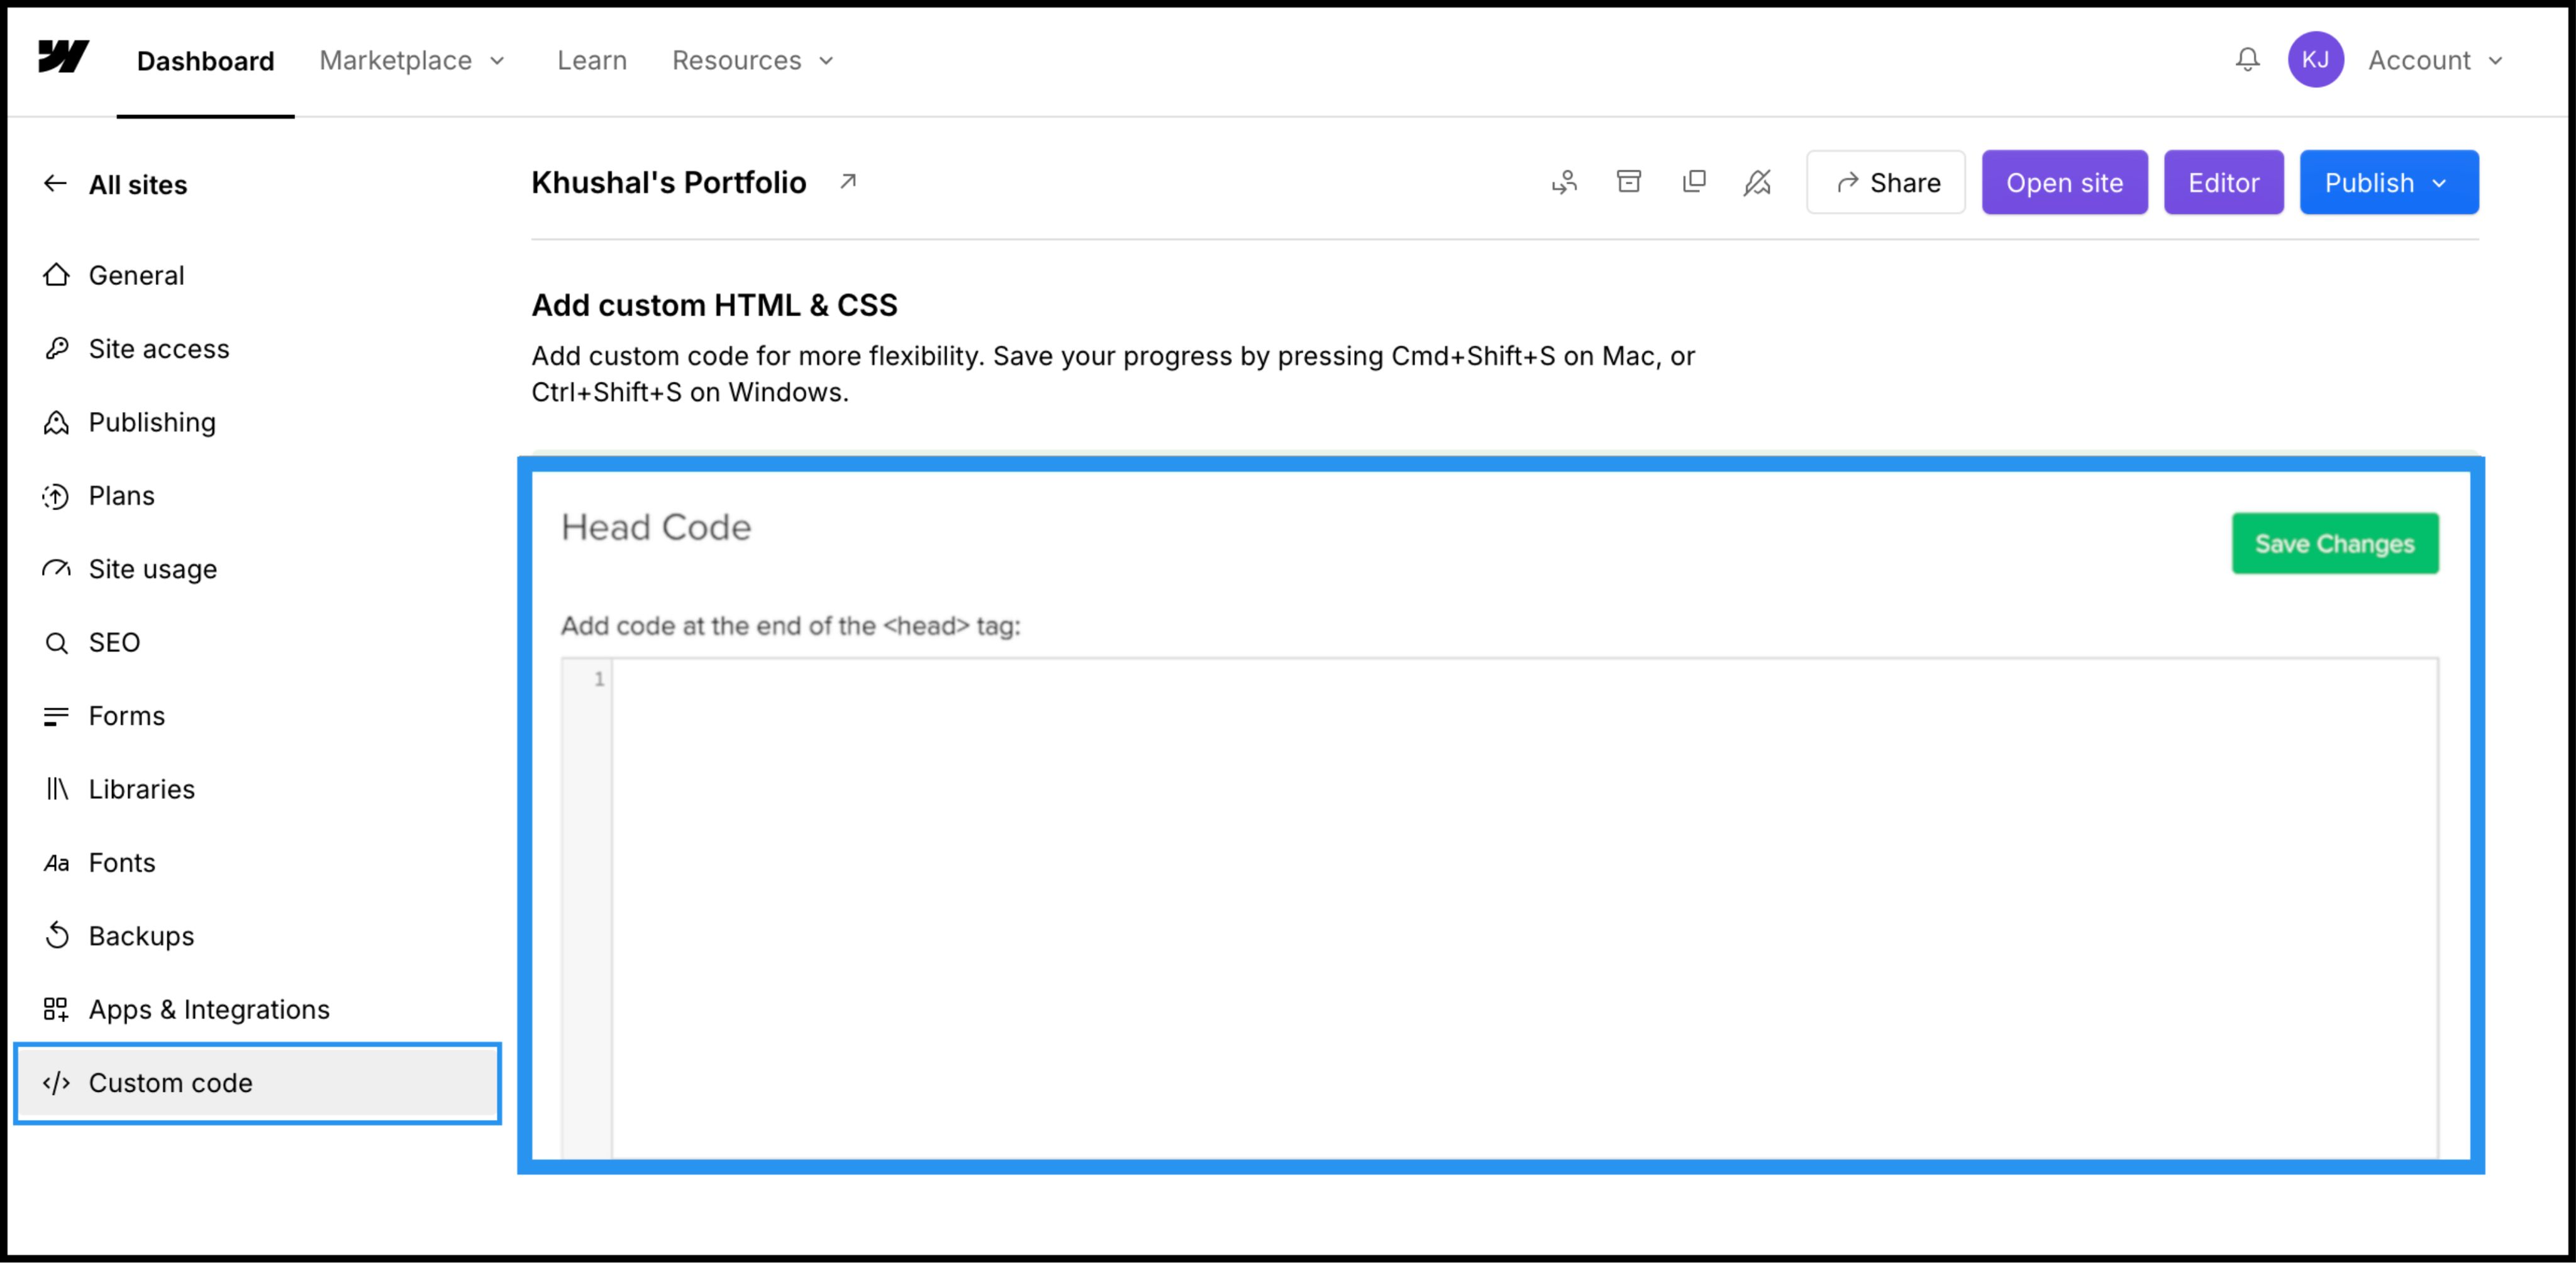
Naviguer vers les Code personnalisé onglet dans la barre de navigation supérieure.
3. Étape 2 : Injection du script d'infrastructure
- 1
Faites défiler vers le bas jusqu'au champ intitulé "Code d'en-tête".
- 2
Remarque : Ne placez pas ceci dans le "Code de pied de page", car cela retarderait le chargement de la traduction et provoquerait un "flash de contenu non traduit".
Action : Coller le script de connexion
Collez le script de connexion suivant dans le champ :
<script
  src="https://multilipistorage.blob.core.windows.net/static/js/page_translations.js"
  key="YOUR_API_KEY_HERE"
></script>
⚠️ Configuration critique
- •Remplacer
VOTRE_CLE_API_ICIavec la clé API réelle copiée depuis votre tableau de bord MultiLipi. - •Cliquez sur le bouton vert Enregistrer les modifications bouton dans le coin supérieur droit.
4. Étape 3 : Déploiement et vérification
Webflow n'exécute pas de code personnalisé dans la vue Designer. Vous devez publier pour voir le moteur en action.
Publier
Cliquez sur le bleu Publier bouton et sélectionnez votre domaine de production (ou .webflow.io domaine de staging).
Vérifier
Ouvrez le lien en direct.
Vérification visuelle
Le sélecteur de langue doit apparaître dans le coin inférieur gauche.
Vérification CMS
Accédez à une page de collection CMS (par exemple, /blog/post-1) et changez de langue pour vous assurer que le contenu dynamique est correctement traduit.
Protocole de dépannage
- •Sélecteur manquant ? Confirmez que vous avez publié le site après avoir enregistré le code.
- •Vérification du plan : Assurez-vous que votre plan d'hébergement Webflow est actif ; les sites de staging gratuits limitent souvent l'exécution de code personnalisé sur des domaines personnalisés.
5. Optimisation et style
Une fois déployé, MultiLipi fonctionne silencieusement en arrière-plan.
Intégrité de la conception
Étant donné que nous ne remplaçons que les nœuds de texte, vos interactions Webflow (IX2) et vos animations de défilement restent parfaitement intactes.
Personnalisation du sélecteur
Vous pouvez repositionner le sélecteur à l'aide des paramètres de notre tableau de bord ou remplacer son CSS pour qu'il corresponde à la typographie spécifique de votre site.
Automatisation SEO
Nous générons automatiquement les sitemap.xml entrées et les hreflang balises pour votre projet Webflow, vous assurant ainsi de vous classer dans les résultats de recherche mondiaux sans travail manuel de référencement.